Showing posts with label Blog Design. Show all posts

Saturday, July 28, 2012

How to Make the Blogger Posts Have a Calendar for the Date in

It's quite common to see calendar style dates next to some WordPress posts, however for the Blogger platform it wouldn't be an easy task to add it. But who said it's impossible? You don't have to look much further than this blog. In this tutorial i'll show you how to create a calendar style date for your Blogger posts.

How to create calendar style dates in Blogger


For adding the calendar style to our blog date header, we should firstly setup the displaying for the date. Log in into your Blogger Dashboard, go to Settings > Formatting - look for the Date Header Format option and change the date so that it is the first day, then the month and finally the year, for example: 28 July 2012 - see the screenshots below

calendar style, calendar icons, blogger tips
If you're using the newer interface: go to Settings > Language and Formatting - Date Header Format and change the date format as you can see in my example below:


Now go to Design > Edit HTML > thick the "Expand Widget Templates" checkbox and search (CTRL + F) the following line:

<h2 class='date-header'><span><data:post.dateHeader/></span></h2>

If you find it twice, replace it twice with the code below:

<div id='Date'>
<script>changeDate(&#39;<data:post.dateHeader/>&#39;);</script>
</div>
<b:else/>
<div id='Date'>
<script>changeDate(&#39;&#39;);</script>
</div>

Now add the following code just ABOVE </head> (CTRL + F to find it)

<script type='text/javascript'>
//<![CDATA[
var DateCalendar;
function changeDate(d){
if (d == "") {
d = DateCalendar;
}
var da = d.split(' ');
day = "<strong class='date_day'>"+da[0]+"</strong>";
month = "<strong class='date_month'>"+da[1].slice(0,3)+"</strong>";
year = "<strong class='date_year'>"+da[2]+"</strong>";
document.write(month+day+year);
DateCalendar = d;
}
//]]>
</script>
<b:if cond='data:blog.pageType != &quot;static_page&quot;'>
<style type='text/css'>
/* Calendar style date
----------------------------------------------- */
#Date {
background: transparent url(https://blogger.googleusercontent.com/img/b/R29vZ2xl/AVvXsEhSqn7ddi6-W5YhxDdvj414Ho97k55OL6ZFWYIaPNvIAOQtn4BfnWXKZOrGa6ZiaJlxjXVLPms_d-fvkpGa3WevzYJ28bPmR1jzXOKHI6SWxUwmnGLOoRgxrUwuXVtJoO_aWrPVy8eoQPBn/s1600/calendar07.png) no-repeat;
display: block;
width:60px;
height:60px;
float: left;
margin: 15px 2px 0 -108px;
padding: 0 0 8px 0px;
border: 0;
text-transform: uppercase;
}
.date_month {
display: block;
font-size: 15px;
font-weight:bold;
margin-top:-1px;
text-align:center;
color:#ffffff; /* Month's color */
}
.date_day {
display: block;
font-size: 28px;
font-weight:bold;
margin-top:-8px;
text-align:center;
color:#282828; /* Day's color */
}
.date_year {
display: block;
font-size: 10px;
margin-top:-8px;
text-align:center;
color:#282828; /* Year's color */
}
</style>
</b:if>


Before saving your Template:

  • To change the calendar style, replace the url in blue with yours;
  • If the calendar doesn't appear correctly, change -108 with 0;
  • With green are marked the areas where you can change the color of the dates
Now Preview your Template and if everything is ok, click on the Save button.

Monday, June 4, 2012

How to Create Drop Caps (Big First Letters) in Blogger/Blogspot

Here's another way you can customize your Blog. In this case, your Posts and Comment's first letter. The effect is a large first letter stretching down three or four lines with the text wrapped around. The drop cap letter can also use a different font and can be a different color to the rest of the text. You often see this style in newspapers, literature, magazines. In this tutorial i will show you how to apply automatically Magazine text style in Blogger Posts and Comments. So let's start adding it!

-> Add Drop Caps For Blogger Posts

drop caps, blogger blogspot, tutorials

-> Add Drop Caps For Blogger Comments

drop caps, first letter, blogger

Big First Letter for your Blogger / Blogspot Posts

Step 1.
  •  If you are using the old Blogger interface:
Go to Dashboard - Design - Edit HTML - Expand Widget Template (make a backup)
  • If you are using the new Blogger interface:
Go to Dashboard - Template - Edit HTML - Proceed - Expand Widget Template (make a backup)

Step 2. Search (CTRL + F) for this piece of code:

]]></b:skin>

Step 3. Just above it, add the following:

.capital:first-letter {
float: left;
display: block;
font-family: Times, serif, Georgia;
font-size: 40px;
color: #000000;
margin:0px 5px 0 0;
padding:0 0 0 10px;
}

Customize:

Color - change the color highlighted in blue with the value of your desired color
Size - to change the letter size, increase/decrease the value highlighted in pink.

Step 4. Now search for this code:

<data:post.body/>

Step 5. Then immediately before and after add the red fragments you see in the example below:

 <div class='capital'><data:post.body/></div>

Step 6. Save your template.

Important! If the above code is not working, add one of following codes from this example:


<p class="capital"><data:post.body/></p>

Or

<span class="capital"><data:post.body/></span>


Big First Letter For Blogger/Blogspot Comments

Step 1. Log in to your Blogger account, then go to Design (Layout) >> Edit HTML >> check the "Expand Widget Templates" box

Step 2. Search (CTRL + F) for this piece of code (if you have already added this code, skip step 2 & 3):

]]></b:skin>

Step 3. Add the following code just above ]]></b:skin>:

.capital:first-letter {
float: left;
display: block;
font-family: Times, serif, Georgia;
font-size: 40px;
color: #000000;
margin:0px 5px 0 0;
padding:0 0 0 10px;
}

Customize:

Color - change the color highlighted in blue with the value of your desired color
Size - to change the letter size, increase/decrease the value highlighted in pink.

Step 4. Then Search for this piece of code:

<data:comment.body/>

Step 5. Add the red codes before and after <data:comment.body/> as you can see in my example below:

<p class="capital"><data:comment.body/></p>

Step 6. Save your Template.

That's it! Now you have a cool drop cap first letter on your blog.
If you have any question, leave a comment below!

Saturday, June 2, 2012

Numbered comments on threaded comments for Blogger/Blogspot

In a past tutorial i've been talking about how you can add numbered comments to your blogger blog but today we'll learn how we can add numbered comments along with comment bubbles on our threaded comments too.

What the following CSS trick will do for you:
  1. When the general block of comments is initiating (.comments-content) a counter called countcomments activates and starts with an initial value of 1. 
  2. Then, each time the code flow goes through a review of any level, either a principal or a reply comment (.comment-thread li), content will bring us in front (:before) of the body of the comment, the number that is the counter at the time.
  3. Then is incremented in one unit the counter (counter-increment).
See the screenshot:
count comments, comment bubble, forum, blogger

Isn't that great? Well, i'm pretty sure many of you have been waiting for this cool trick. So let's begin applying it for our threaded comments system.

Steps to add bubble comments count:

Step #1: If you are using the old Blogger interface:
  • Go to Dashboard - Design - Edit HTML - Expand Widget Template (make a backup)
If you are using the new Blogger interface:
  • Go to Dashboard - Template - Edit HTML - Proceed - Expand Widget Template (make a backup)


Step #2Search (CTRL + F) for this piece of code:

]]></b:skin>

Add the following code just above it:

.comment-thread ol {
counter-reset: countcomments;
}
.comment-thread li:before {
content: counter(countcomments,decimal);
counter-increment: countcomments;
float: right;
font-size: 22px;
color: #555555;
padding-left:10px; 
padding-top:3px; 
background: url(
https://blogger.googleusercontent.com/img/b/R29vZ2xl/AVvXsEiGMxOdBCAvLWw6CAvkhHRCqSWtsVciclvjdeAO-VNgvCp7ua8BOoE0S0Aryf8ArQCuzvZlc3jV55iq_6dh0RlEffGupbY1SIigSIOoq52UwT5cZfB5TW9W5_wuGJT6wYNkqnU_rImgyEBX/s1600/comment+bubble2.png) no-repeat;
margin-top:7px; 
margin-left:10px; 
width: 50px; /*image-width size*/
height: 48px; /*image-height size*/ 

}
.comment-thread ol ol {
counter-reset: contrebasse;
}
.comment-thread li li:before {
content: counter(countcomments,decimal) "." counter(contrebasse,lower-latin);
counter-increment: contrebasse;
float: right;
font-size: 18px;
color: #666666;
}

Note:
  • remove the code in red (including the blue code) if you want to remove the comment bubble
  • to change the comment bubble, replace the code in blue with the URL address of your own icon. If you're undecided what icon you should use, you can find some cool icons in my previous posts (check out here and here)
  • to change the position of comments count, increase/decrease the values (3 & 10) from padding-top and padding-left
  • to change the position of comments bubble/icon, change the values (10 & 7) from margin-left and margin-top
Step #3: Now save the template and you're done!

 If you enjoy reading this blog, please share and subscribe. For any questions, leave a comment below.

Thursday, May 31, 2012

Create A Rollover Image Effect (change image on mouseover)

The Rollover effect is one in which an image web object changes (swaps itself) on mouse over to another web object (called rollovers) and reverts back to the original image on mouse out. Rollover images are preloaded into the page when it is loading, this ensures that the rollovers are displayed quickly. The onMouseOver and onMouseOut attributes of the link tag are used to make this functional.

Demo:  Place your mouse over the image below to see its rollover effect

Image source: mdgraphs.deviantart.com

Making Rollover Effect Image

You have the following code:

<a href="URL ADDRESS"><img src="URL OF THE FIRST IMAGE GOES HERE" onmouseover="this.src='URL OF THE SECOND IMAGE GOES HERE'" onmouseout="this.src='URL OF THE FIRST IMAGE GOES HERE'" /></a>

Change the colored texts as it follows:

1. URL ADDRESS

This is the address you want the image to lead to when it's clicked.
Example : http://www.bloggingcreate.blogspot.com

2. URL OF THE FIRST IMAGE GOES HERE

Replace the green text (two times) with image's url address - this is the image shown before you hover over it.
Example: http://i1256.photobucket.com/albums/ii494/helplogger76/helploggerblogspotcomstickie3.png

3. URL OF THE SECOND IMAGE GOES HERE
Replace the text in red with the url of your image - this image will appear when your cursor hovers over it.
Example: http://i1256.photobucket.com/albums/ii494/helplogger76/helploggerblogspotcomstickie2.png

Now you can paste your image inside a blog gadget, going to Page Elements > Add a Gadget > Select "HTML/JavaScript and add it to your sidebar Or you can add it inside your post by going to New Post > Switch to Edit HTML tab and then paste the code in the empty box. That's it.

Sunday, May 6, 2012

How to Change Default Anonymous Avatar in Blogger Comments

In the past tutorial you've learned how you can change avatars size in blogger comments but this simple tutorial will show you how to change or customize default avatar of anonymous commenters or Blogger users with no photo added on their profiles. After Blogger announced new feature of threaded comment, we can still customize it by adding a jQuery plugin to our template and replacing the default anonymous avatar URL http://img1.blogblog.com/img/anon36.png and the one for blogger users http://img2.blogblog.com/img/b36-rounded.png with our own.

anonymous, default avatar, blogger blogspot

Step 1.

If you are using the old Blogger interface:
  • Go to Dashboard - Design - Edit HTML - Expand Widget Template (make a backup)
If you are using the new Blogger interface:
  • Go to Dashboard - Template - Edit HTML - Proceed - Expand Widget Template (make a backup)

Step 2. Find (CTRL + F) this code in your template:

</body>

Step 3. Add the following code just above it:

<script src='http://code.jquery.com/jquery-latest.js'/>
<script>
$(&quot;img[src=&#39;http://img1.blogblog.com/img/anon36.png&#39;]&quot;)
.attr(&#39;src&#39;, &#39;https://blogger.googleusercontent.com/img/b/R29vZ2xl/AVvXsEgvtBBRNqXiyDWpkMhoiOJFy_1U-tjKE4olCwoYtYIMo-gNGdk0jGWeJeOnu7cbfxGGBxfMqS_1QiVT5owFqJjb75SeLb2Sn6WFwPWIhrY1eXRtlW-JA8iEV8Fc36Jx6Wlq3X6Pg05HIV0/s1600/default_avatar.gif&#39;)
.ssyby(&#39;blank&#39;)
</script>
<script src='http://code.jquery.com/jquery-latest.js'/>
<script>
$(&quot;img[src=&#39;http://img2.blogblog.com/img/b36-rounded.png&#39;]&quot;)
.attr(&#39;src&#39;, &#39;https://blogger.googleusercontent.com/img/b/R29vZ2xl/AVvXsEi1UuZ-ICw_usD595bFogfxTEUcQYtb8NzZRRsFnulC5eYRI4op5zCgy9MQ2zYU3pifNuWZe6NPdMWx_KYbp_qDKJVOQ1alkByWdg8cDwsmjGIrZyr4Im439-LAZ6qyFGIC7M_AcSmYh4Q/s1600/blogger-user.png&#39;)
.ssyby(&#39;blank&#39;)
</script>

Step 4. Save the Template

How to change avatar:

For Anonymous users: Replace the code in red with the url address of your image
For Blogger users: Replace the URL in blue with your own.

You can choose one from these below (copy the url address):


https://blogger.googleusercontent.com/img/b/R29vZ2xl/AVvXsEgvtBBRNqXiyDWpkMhoiOJFy_1U-tjKE4olCwoYtYIMo-gNGdk0jGWeJeOnu7cbfxGGBxfMqS_1QiVT5owFqJjb75SeLb2Sn6WFwPWIhrY1eXRtlW-JA8iEV8Fc36Jx6Wlq3X6Pg05HIV0/s200/default_avatar.gif


https://blogger.googleusercontent.com/img/b/R29vZ2xl/AVvXsEiBpg5Dvp5aWCsza7INuagqXVR1J7rPdQwSGrSkhHy3Xjw4CdsFkLKT_ykQ2FiEb0HSJfpl5Rmc-f9CkEzOt2QlqNG5qP5wGZiU8AoEp2A36X5xWvIsJCMWRRpc0fUBUTvE1MojpC9skOY/s1600/facebook.gif


https://blogger.googleusercontent.com/img/b/R29vZ2xl/AVvXsEimMpduyWLBOkGlj0u14DIwYHEfL0G3WRStKj7KykNC6_gOFv-oPmqqRgo_undEsUiVBjlluqq3fr_Q-bYTbW_KrxoP0cpSYKzbkN18-45PU0isKghyR4-WCsU3aRGco6xd98oA4fHPC9E/s1600/anonymous3.png


https://blogger.googleusercontent.com/img/b/R29vZ2xl/AVvXsEggtxC1JoZJJfNYo2K8u0VkzLrIX4o0O9Fo6mcj3H_kqRp4fLmKpUhgZpvI4JGOfuUdcPOLqNZDjm32eKKxtX-IbE_wZLM7pVgohqnuLtI7EYMzMZBZgL9wJx8ppxE1JXdVuoE7edvU3jx2/s1600/blogger-user.png

If you liked this post, please consider sharing it. Thanks!

Saturday, May 5, 2012

How To Change Avatar Size In Blogger Comments

This simple trick will help you to change the avatars size in Blogger comments. For changing the style and size of avatars, we should add some CSS codes in our Blogger template.


Step 1.

If you are using the old Blogger interface:
  • Go to Dashboard - Design - Edit HTML - Expand Widget Template (make a backup)
If you are using the new Blogger interface:
  • Go to Dashboard - Template - Edit HTML - Proceed - Expand Widget Template (make a backup)

Step 2. Find (CTRL + F) this code in your template:

]]></b:skin>

Step 3. Copy and paste one of the following codes just above it:

[Works in Blogger threaded comment system]

.comments .avatar-image-container{
background-color: rgb(34, 34, 34);
border:1px solid #ccc;
margin: 0px 10px 0px 0px;
padding: 0px 0px 0px 0px;
width: 64px;
max-height: 64px;
}
.comments .avatar-image-container img{
margin: 0px 0px 0px 0px;
padding: 0px 0px 0px 0px;
max-width: 64px;
height: 64px;
}

[for old blogger commenting system]

.avatar-image-container{
border:1px solid #d6d6d6;
margin-left: -30px;
-moz-border-radius: 4px;
background:#fff;
height:70px;
min-height: 70px;
width:70px;
min-width:70px;
}
.avatar-image-container img {
background: url(https://blogger.googleusercontent.com/img/b/R29vZ2xl/AVvXsEjomxwmH0b9oPny1u95ofQOO2qoS3JIyPbcUZKm8Ov11N-ysmsYe2kIGuNMZTs-8eJfGwBIXVCQl10qaVi1v-boRJKepw-afXwZTEQ9pkdKCpOaUlrs26R067RLKCAhmqh55SaRPbwKyTA/s200/anonymous.jpg);
background-repeat: no-repeat;
background-position: center;
background-size: 100%;
width:70px;
min-width:70px;
height:70px;
min-height:70px;
}

Note: If you want bigger/smaller avatars, change the values in red. To change the anonymous avatar, replace the URL address in blue with your own. (works only for previous commenting system)

Step 4. Save the Template.

Now view your blog to see the results.
Enjoy!

Show Blogger Image only in Homepage and Hide it in Post Page


Want to know how to hide specific images from blogger posts pages and to appear only in homepage? In this tutorial we'll learn how we can do this! So let's start hiding our images from posts pages:

Step 1. 


If you are using the old Blogger interface:
  • Go to Dashboard - Design - Edit HTML - Expand Widget Template (make a backup)
If you are using the new Blogger interface:
  • Go to Dashboard - Template - Edit HTML - Proceed - Expand Widget Template (make a backup)
Step 2. Find (CTRL + F) this code in your template:

    }]]></b:skin>

Step 3. Copy and paste the following code just below it

<b:if cond='data:blog.pageType != &quot;index&quot;'>
<style>
.hidepic{
display: none;
}
</style>
</b:if>

Step 4. Save the Template.

Now everytime you create a post, firstly add the pic you want to hide and then switch to Edit HTML tab where you'll see the HTML code of the image you have added that will look something like this:

<div class="separator" style="clear: both; text-align: center;">
<a href="https://blogger.googleusercontent.com/img/b/R29vZ2xl/AVvXsEhaqBLo3Cco4jjICb6WVrydPvRU7DHj8yRDtZcVvzG2FFqC4RE3rqZKYgnMBgTUHmrPHkal0I5NkXQSwLfW5JNrcO22-pmQUd5E0AvTUJRBGYJLdwnEqszrYy1hTauX_lhRax7rIA9KA5A/s1600/fire_bird_by_fhrankee-d32af8v.png" imageanchor="1" style="margin-left: 1em; margin-right: 1em;"><img border="0" height="320" src="https://blogger.googleusercontent.com/img/b/R29vZ2xl/AVvXsEhaqBLo3Cco4jjICb6WVrydPvRU7DHj8yRDtZcVvzG2FFqC4RE3rqZKYgnMBgTUHmrPHkal0I5NkXQSwLfW5JNrcO22-pmQUd5E0AvTUJRBGYJLdwnEqszrYy1hTauX_lhRax7rIA9KA5A/s320/fire_bird_by_fhrankee-d32af8v.png" width="320" /></a></div>

Note: it should be at the exact location where your image has been added (if the image is at the middle of the text, then the code should be located also at the middle)
All you have to do is to replace "separator" with "hidepic" as you can see in this screenshot below:


That's it!

How to Remove Showing Posts With Label in Blogger

label, blogger, remove, how to

For any default Blogger layout, the "Showing posts with label" message shows up above the posts whenever you click on a label link.
remove labels, blogger, how to, tricks

As it's a pretty useless and annoying message, many people like to have it removed. If that is your wish, just follow the tutorial below:

Removing "Showing post with label...show all posts"

Step 1.

If you are using the old Blogger interface:

  • Go to Dashboard - Design - Edit HTML - Expand Widget Template (make a backup)

If you are using the new Blogger interface:

  • Go to Dashboard - Template - Edit HTML - Proceed - Expand Widget Template (make a backup)

Step 2. Now find (CTRL+F) this code in the template:


<b:includable id='status-message'>
  <b:if cond='data:navMessage'>
  <div class='status-msg-wrap'>
    <div class='status-msg-body'>
      <data:navMessage/>
    </div>
    <div class='status-msg-border'>
      <div class='status-msg-bg'>
        <div class='status-msg-hidden'><data:navMessage/></div>
      </div>
    </div>
  </div>
  <div style='clear: both;'/>
  </b:if>
</b:includable>


Step 3. Delete the code from above and replace it with this one:

<b:includable id='status-message'>
<b:if cond='data:navMessage'>
<div>
</div>
<div style='clear: both;'/>
</b:if>
</b:includable>

Save the template. View your blog and click on some label....no more box.

Wednesday, April 18, 2012

How To Add or Change Favicon on Blogger Blogspot

Favicon (Favorites Icon) is the small picture (usually 16px x 16px in size) you see beside some some site's name in your browser's address bar.

change blogger favicon

Having your own favicon with a nice graphical reminder of your site beside is a good way to get visitors attention again. Now Blogger users can add a custom favicon for their blogs from the Design > Page Elements tab, by clicking on the Edit link on the "Favicon" element above the navbar element.

"For many bloggers, having a custom favicon (the tiny image displayed in your browser’s window or tab) is the finishing touch that ties together the design and identity of a great looking blog. Today, we're pleased to announce that Blogger in Draft users can now add a customized favicon to their blog. ~Blogger in Draft"

Steps adding your own favicon

1. Log in to your Blogger's Dashboard, go to the Design -> Page Elements.

2. Click on the "Edit" link on the "Favicon" setting above the navbar element.

3. A popup window will open where you can search for an image in your hard drive to replace the default favicon image. Click on "choose file" button and search for your favicon (it should have the .ico extension) - then click on "Save".

4. Now you should see your own favicon instead of blogger's default favicon.


Don't worry if it won't appear immediately. It may take some time until your new favicon will show in your Browser's tab or window.

If you want to add animated favicons to your Blogger blogs, then you should follow another method.

How to add an animated favicon in Blogger

1. Log in to your Blogger account > Design > Edit HTML > check the "Expand widget templates" box

2. Search (CTRL + F) for:

 <b:skin> 

3. And just above it, paste this code:

<link href="your-favicon-links-goes-here" rel="icon" type="image/gif"/>

See the screenshot for more details
animated favicon blogger, how to


Note: replace your-favicon-links-goes-here with your favicon's link location
You can choose from here some cool favicons for your site/blog: http://www.favicon.cc/ (just download the favicon you like - upload it on tinypic or on a blogger's post, then copy the link address/direct link)

4. Save the Template.

Now your favicon should be alive. Just view your blog to see it in action (:

How to number comments in Blogger/BlogSpot

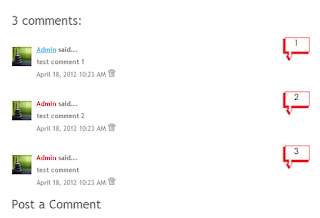
In the last tutorial i showed you how you can add a comment bubble to blogger posts titles. But this Blogger hack will add numbers with a cool speech bubble in all the comments in your blog. Each number will be linked to that comment so that you & your readers can use these numbers and corresponding links to mention or point a particular comment on any of your posts.

blogger blogspot, tricks
This works only with previous blogger commenting system, therefore if you want to add this hack, you should first remove Blogger threaded comments. Learn here How to remove Blogger threaded comments


UPDATE! Now you can add comment bubble to your threaded comments too. Please read this post: Numbered Comments On Threaded Comments for Blogger/Blogspot

So let's start adding numbered comments on our Blogger/Blogspot blog
how to blog, blogspot blogger

Step 1.

If you are using the old Blogger interface:

  • Go to Dashboard - Design - Edit HTML - Expand Widget Template (make a backup)

If you are using the new Blogger interface:

  • Go to Dashboard - Template - Edit HTML - Proceed - Expand Widget Template (make a backup)


Step 2. Now find (CTRL+F) this code in the template:

<b:loop values='data:post.comments' var='comment'>

Step 3. Immediately above/before that, paste this code:

<script type='text/javascript'>var CommentsCounter=0;</script>

Step 4. Now find this code:

<data:commentPostedByMsg/>

Step 5. And immediately below/after it, paste this code:

<!--comments-count-starts-->
<span class='comments-number'>
<a expr:href='data:comment.url' title='Comment Link'>
<script type='text/javascript'>
CommentsCounter=CommentsCounter+1;
document.write(CommentsCounter)
</script>
</a>
</span>
<!--comments-count-stops-->

Step 6. Find (CTRL+F) this code in the template:

</head>

Step 7. And immediately above/before it, paste this code:

<!-- comments-count-starts-->
<style type="text/css">
.comments-number a:link, .comments-number a:visited {
color: black !important;
text-decoration: none !important;
background: url(https://blogger.googleusercontent.com/img/b/R29vZ2xl/AVvXsEgOrMZxECI4csgXZx_oTRaeXsiaFEslYB50G_E_pRK2TlbBQM0gze1TmwwnfFrbjOj_mPHdwNIxyfrhBfdPA9Iz5riAFuxVU8RobqpjN0Zqf-zfzYSHBzgfUty6KzlBTfKw66XHHAH8LI2P/s1600/comment+bubble+1.png) no-repeat;
width: 50px; /*image-width size*/
height: 48px; /*image-height size*/
float: right;
display: block;
margin-right: 5px;
margin-top: -15px; /*comments-counter position*/
text-align: center;
font-family: 'Century Gothic','Lucida Grande',Arial,Helvetica,Sans-Serif;
font-size: 15px;
font-weight: normal;
}
.comments-number a:hover, .comments-number a:active {
color: #1BA0E1 !important;
text-decoration: none !important;
}
</style>
<!-- comments-count-stops-http://bloggingcreate.blogspot.com-->

Settings:
To change the image, edit the red code above
To change the color of the numbers, edit the code in blue

Images you may use (right-click on the desired image and select "Copy Image Address/Location"):


how to blogblogger blogspotblogspot blogger, how to blogwidget blogger blogspotblogs, how to blogblogspot or blogger, how to blogtutorials, how tocomments, how to, blogspot bloggernew comment, how to blogblog design, bloggerblogger.com


IMPORTANT: You may use any image instead of the one linked in the code above (STEP 7), but you have to mention its dimensions correctly (width and height) for correct placement of numbers on the image.

Step 8. Finally save the template... and enjoy your comments :]

Monday, April 16, 2012

How to Add A Comment Count Bubble To Blogger Post Titles

Having a comment count bubble to each blogger post titles makes your blog more attractive. This improves not only your comments count but also allows your visitors to see what are the most popular posts on your blog. If a post has more comments then it will show the popularity of posts to your readers and visitors. So let's start adding this feature to your blog post titles by displaying the total count of the comments for your Blogger posts:
Step 1.

 If you are using the old Blogger interface:
  • Go to Dashboard - Design - Edit HTML - Expand Widget Template (make a backup)
If you are using the new Blogger interface:
  • Go to Dashboard - Template - Edit HTML - Proceed - Expand Widget Template (make a backup)
Step 2. Find (CTRL + F) the following piece of code in your template:

]]></b:skin>

Step 3. Place this code just above ]]></b:skin>:

.comment-bubble {
float : right;
width : 48px;
height : 48px;
background : url(https://blogger.googleusercontent.com/img/b/R29vZ2xl/AVvXsEjPlp-Y00_sIpQerGWN6olaQxmIO-U57_BNaxTduTSPtrptKkj6pEodEPo5R3AR6Zaxtk-vGwVv9kG6f9A-hRjsbFp0MZRLy_SdGhMRD3gkqFHUrq31EapZ8_7hs_K_XKFcvN8teKCei6c2/s1600/speech+bubble+green.png);
background-repeat: no-repeat;
font-size : 18px;
margin-top : -15px;
margin-right : 2px;
text-align : center;
}

Step 4. Now find the below code:

<b:if cond='data:post.title'>
<h3 class='post-title entry-title'>

Note: If you can't find it, search this code instead:

<b:if cond='data:post.title'>
      <h3 class='post-title entry-title' itemprop='name'>

Step 5. Add this code immediately after it:

<b:if cond='data:post.allowComments'>
<a class='comment-bubble' expr:href='data:post.addCommentUrl' expr:onclick='data:post.addCommentOnclick' style='color: #ffffff; font-size: 18px; font-weight: bold;'><data:post.numComments/></a>
</b:if>

Note:
- to change the color of the comments number, replace #ffffff with the hex value of your color;
- to change the font size, increase/decrease the 18px value;

Step 6. Now Preview your template and if everything is ok, Save the Template.

You can choose one of these images below (Right click on the desired image and select "Copy Image Address/Location" - paste it instead of the red code from step 3)

bubble comment count, bubble blogger postsblogger comments, comment countblogger blogspot, blogger commentsblogger bubble comment countcomments in blogger titlesblogger tips, blogger tricksblogger widgets, bubble comment countbubble comment countBubble Comment CountBubble Comment Count, blogger blogspot

Enjoy (:

Didn't find what your were looking for? Then you might be interested in this tutorial:
Display post author, date, labels and comments with icons below post titles
//PART 2