Showing posts with label Hacks. Show all posts

Saturday, July 28, 2012

How to Make the Blogger Posts Have a Calendar for the Date in

It's quite common to see calendar style dates next to some WordPress posts, however for the Blogger platform it wouldn't be an easy task to add it. But who said it's impossible? You don't have to look much further than this blog. In this tutorial i'll show you how to create a calendar style date for your Blogger posts.

How to create calendar style dates in Blogger


For adding the calendar style to our blog date header, we should firstly setup the displaying for the date. Log in into your Blogger Dashboard, go to Settings > Formatting - look for the Date Header Format option and change the date so that it is the first day, then the month and finally the year, for example: 28 July 2012 - see the screenshots below

calendar style, calendar icons, blogger tips
If you're using the newer interface: go to Settings > Language and Formatting - Date Header Format and change the date format as you can see in my example below:


Now go to Design > Edit HTML > thick the "Expand Widget Templates" checkbox and search (CTRL + F) the following line:

<h2 class='date-header'><span><data:post.dateHeader/></span></h2>

If you find it twice, replace it twice with the code below:

<div id='Date'>
<script>changeDate(&#39;<data:post.dateHeader/>&#39;);</script>
</div>
<b:else/>
<div id='Date'>
<script>changeDate(&#39;&#39;);</script>
</div>

Now add the following code just ABOVE </head> (CTRL + F to find it)

<script type='text/javascript'>
//<![CDATA[
var DateCalendar;
function changeDate(d){
if (d == "") {
d = DateCalendar;
}
var da = d.split(' ');
day = "<strong class='date_day'>"+da[0]+"</strong>";
month = "<strong class='date_month'>"+da[1].slice(0,3)+"</strong>";
year = "<strong class='date_year'>"+da[2]+"</strong>";
document.write(month+day+year);
DateCalendar = d;
}
//]]>
</script>
<b:if cond='data:blog.pageType != &quot;static_page&quot;'>
<style type='text/css'>
/* Calendar style date
----------------------------------------------- */
#Date {
background: transparent url(https://blogger.googleusercontent.com/img/b/R29vZ2xl/AVvXsEhSqn7ddi6-W5YhxDdvj414Ho97k55OL6ZFWYIaPNvIAOQtn4BfnWXKZOrGa6ZiaJlxjXVLPms_d-fvkpGa3WevzYJ28bPmR1jzXOKHI6SWxUwmnGLOoRgxrUwuXVtJoO_aWrPVy8eoQPBn/s1600/calendar07.png) no-repeat;
display: block;
width:60px;
height:60px;
float: left;
margin: 15px 2px 0 -108px;
padding: 0 0 8px 0px;
border: 0;
text-transform: uppercase;
}
.date_month {
display: block;
font-size: 15px;
font-weight:bold;
margin-top:-1px;
text-align:center;
color:#ffffff; /* Month's color */
}
.date_day {
display: block;
font-size: 28px;
font-weight:bold;
margin-top:-8px;
text-align:center;
color:#282828; /* Day's color */
}
.date_year {
display: block;
font-size: 10px;
margin-top:-8px;
text-align:center;
color:#282828; /* Year's color */
}
</style>
</b:if>


Before saving your Template:

  • To change the calendar style, replace the url in blue with yours;
  • If the calendar doesn't appear correctly, change -108 with 0;
  • With green are marked the areas where you can change the color of the dates
Now Preview your Template and if everything is ok, click on the Save button.

Sunday, May 6, 2012

How to Change Default Anonymous Avatar in Blogger Comments

In the past tutorial you've learned how you can change avatars size in blogger comments but this simple tutorial will show you how to change or customize default avatar of anonymous commenters or Blogger users with no photo added on their profiles. After Blogger announced new feature of threaded comment, we can still customize it by adding a jQuery plugin to our template and replacing the default anonymous avatar URL http://img1.blogblog.com/img/anon36.png and the one for blogger users http://img2.blogblog.com/img/b36-rounded.png with our own.

anonymous, default avatar, blogger blogspot

Step 1.

If you are using the old Blogger interface:
  • Go to Dashboard - Design - Edit HTML - Expand Widget Template (make a backup)
If you are using the new Blogger interface:
  • Go to Dashboard - Template - Edit HTML - Proceed - Expand Widget Template (make a backup)

Step 2. Find (CTRL + F) this code in your template:

</body>

Step 3. Add the following code just above it:

<script src='http://code.jquery.com/jquery-latest.js'/>
<script>
$(&quot;img[src=&#39;http://img1.blogblog.com/img/anon36.png&#39;]&quot;)
.attr(&#39;src&#39;, &#39;https://blogger.googleusercontent.com/img/b/R29vZ2xl/AVvXsEgvtBBRNqXiyDWpkMhoiOJFy_1U-tjKE4olCwoYtYIMo-gNGdk0jGWeJeOnu7cbfxGGBxfMqS_1QiVT5owFqJjb75SeLb2Sn6WFwPWIhrY1eXRtlW-JA8iEV8Fc36Jx6Wlq3X6Pg05HIV0/s1600/default_avatar.gif&#39;)
.ssyby(&#39;blank&#39;)
</script>
<script src='http://code.jquery.com/jquery-latest.js'/>
<script>
$(&quot;img[src=&#39;http://img2.blogblog.com/img/b36-rounded.png&#39;]&quot;)
.attr(&#39;src&#39;, &#39;https://blogger.googleusercontent.com/img/b/R29vZ2xl/AVvXsEi1UuZ-ICw_usD595bFogfxTEUcQYtb8NzZRRsFnulC5eYRI4op5zCgy9MQ2zYU3pifNuWZe6NPdMWx_KYbp_qDKJVOQ1alkByWdg8cDwsmjGIrZyr4Im439-LAZ6qyFGIC7M_AcSmYh4Q/s1600/blogger-user.png&#39;)
.ssyby(&#39;blank&#39;)
</script>

Step 4. Save the Template

How to change avatar:

For Anonymous users: Replace the code in red with the url address of your image
For Blogger users: Replace the URL in blue with your own.

You can choose one from these below (copy the url address):


https://blogger.googleusercontent.com/img/b/R29vZ2xl/AVvXsEgvtBBRNqXiyDWpkMhoiOJFy_1U-tjKE4olCwoYtYIMo-gNGdk0jGWeJeOnu7cbfxGGBxfMqS_1QiVT5owFqJjb75SeLb2Sn6WFwPWIhrY1eXRtlW-JA8iEV8Fc36Jx6Wlq3X6Pg05HIV0/s200/default_avatar.gif


https://blogger.googleusercontent.com/img/b/R29vZ2xl/AVvXsEiBpg5Dvp5aWCsza7INuagqXVR1J7rPdQwSGrSkhHy3Xjw4CdsFkLKT_ykQ2FiEb0HSJfpl5Rmc-f9CkEzOt2QlqNG5qP5wGZiU8AoEp2A36X5xWvIsJCMWRRpc0fUBUTvE1MojpC9skOY/s1600/facebook.gif


https://blogger.googleusercontent.com/img/b/R29vZ2xl/AVvXsEimMpduyWLBOkGlj0u14DIwYHEfL0G3WRStKj7KykNC6_gOFv-oPmqqRgo_undEsUiVBjlluqq3fr_Q-bYTbW_KrxoP0cpSYKzbkN18-45PU0isKghyR4-WCsU3aRGco6xd98oA4fHPC9E/s1600/anonymous3.png


https://blogger.googleusercontent.com/img/b/R29vZ2xl/AVvXsEggtxC1JoZJJfNYo2K8u0VkzLrIX4o0O9Fo6mcj3H_kqRp4fLmKpUhgZpvI4JGOfuUdcPOLqNZDjm32eKKxtX-IbE_wZLM7pVgohqnuLtI7EYMzMZBZgL9wJx8ppxE1JXdVuoE7edvU3jx2/s1600/blogger-user.png

If you liked this post, please consider sharing it. Thanks!

Saturday, May 5, 2012

Show Blogger Image only in Homepage and Hide it in Post Page


Want to know how to hide specific images from blogger posts pages and to appear only in homepage? In this tutorial we'll learn how we can do this! So let's start hiding our images from posts pages:

Step 1. 


If you are using the old Blogger interface:
  • Go to Dashboard - Design - Edit HTML - Expand Widget Template (make a backup)
If you are using the new Blogger interface:
  • Go to Dashboard - Template - Edit HTML - Proceed - Expand Widget Template (make a backup)
Step 2. Find (CTRL + F) this code in your template:

    }]]></b:skin>

Step 3. Copy and paste the following code just below it

<b:if cond='data:blog.pageType != &quot;index&quot;'>
<style>
.hidepic{
display: none;
}
</style>
</b:if>

Step 4. Save the Template.

Now everytime you create a post, firstly add the pic you want to hide and then switch to Edit HTML tab where you'll see the HTML code of the image you have added that will look something like this:

<div class="separator" style="clear: both; text-align: center;">
<a href="https://blogger.googleusercontent.com/img/b/R29vZ2xl/AVvXsEhaqBLo3Cco4jjICb6WVrydPvRU7DHj8yRDtZcVvzG2FFqC4RE3rqZKYgnMBgTUHmrPHkal0I5NkXQSwLfW5JNrcO22-pmQUd5E0AvTUJRBGYJLdwnEqszrYy1hTauX_lhRax7rIA9KA5A/s1600/fire_bird_by_fhrankee-d32af8v.png" imageanchor="1" style="margin-left: 1em; margin-right: 1em;"><img border="0" height="320" src="https://blogger.googleusercontent.com/img/b/R29vZ2xl/AVvXsEhaqBLo3Cco4jjICb6WVrydPvRU7DHj8yRDtZcVvzG2FFqC4RE3rqZKYgnMBgTUHmrPHkal0I5NkXQSwLfW5JNrcO22-pmQUd5E0AvTUJRBGYJLdwnEqszrYy1hTauX_lhRax7rIA9KA5A/s320/fire_bird_by_fhrankee-d32af8v.png" width="320" /></a></div>

Note: it should be at the exact location where your image has been added (if the image is at the middle of the text, then the code should be located also at the middle)
All you have to do is to replace "separator" with "hidepic" as you can see in this screenshot below:


That's it!

How to Remove Showing Posts With Label in Blogger

label, blogger, remove, how to

For any default Blogger layout, the "Showing posts with label" message shows up above the posts whenever you click on a label link.
remove labels, blogger, how to, tricks

As it's a pretty useless and annoying message, many people like to have it removed. If that is your wish, just follow the tutorial below:

Removing "Showing post with label...show all posts"

Step 1.

If you are using the old Blogger interface:

  • Go to Dashboard - Design - Edit HTML - Expand Widget Template (make a backup)

If you are using the new Blogger interface:

  • Go to Dashboard - Template - Edit HTML - Proceed - Expand Widget Template (make a backup)

Step 2. Now find (CTRL+F) this code in the template:


<b:includable id='status-message'>
  <b:if cond='data:navMessage'>
  <div class='status-msg-wrap'>
    <div class='status-msg-body'>
      <data:navMessage/>
    </div>
    <div class='status-msg-border'>
      <div class='status-msg-bg'>
        <div class='status-msg-hidden'><data:navMessage/></div>
      </div>
    </div>
  </div>
  <div style='clear: both;'/>
  </b:if>
</b:includable>


Step 3. Delete the code from above and replace it with this one:

<b:includable id='status-message'>
<b:if cond='data:navMessage'>
<div>
</div>
<div style='clear: both;'/>
</b:if>
</b:includable>

Save the template. View your blog and click on some label....no more box.

Wednesday, April 18, 2012

How to number comments in Blogger/BlogSpot

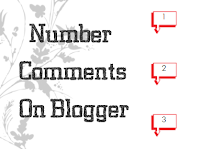
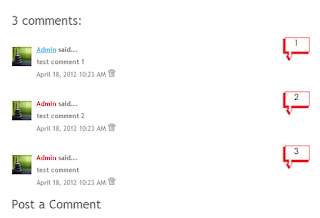
In the last tutorial i showed you how you can add a comment bubble to blogger posts titles. But this Blogger hack will add numbers with a cool speech bubble in all the comments in your blog. Each number will be linked to that comment so that you & your readers can use these numbers and corresponding links to mention or point a particular comment on any of your posts.

blogger blogspot, tricks
This works only with previous blogger commenting system, therefore if you want to add this hack, you should first remove Blogger threaded comments. Learn here How to remove Blogger threaded comments


UPDATE! Now you can add comment bubble to your threaded comments too. Please read this post: Numbered Comments On Threaded Comments for Blogger/Blogspot

So let's start adding numbered comments on our Blogger/Blogspot blog
how to blog, blogspot blogger

Step 1.

If you are using the old Blogger interface:

  • Go to Dashboard - Design - Edit HTML - Expand Widget Template (make a backup)

If you are using the new Blogger interface:

  • Go to Dashboard - Template - Edit HTML - Proceed - Expand Widget Template (make a backup)


Step 2. Now find (CTRL+F) this code in the template:

<b:loop values='data:post.comments' var='comment'>

Step 3. Immediately above/before that, paste this code:

<script type='text/javascript'>var CommentsCounter=0;</script>

Step 4. Now find this code:

<data:commentPostedByMsg/>

Step 5. And immediately below/after it, paste this code:

<!--comments-count-starts-->
<span class='comments-number'>
<a expr:href='data:comment.url' title='Comment Link'>
<script type='text/javascript'>
CommentsCounter=CommentsCounter+1;
document.write(CommentsCounter)
</script>
</a>
</span>
<!--comments-count-stops-->

Step 6. Find (CTRL+F) this code in the template:

</head>

Step 7. And immediately above/before it, paste this code:

<!-- comments-count-starts-->
<style type="text/css">
.comments-number a:link, .comments-number a:visited {
color: black !important;
text-decoration: none !important;
background: url(https://blogger.googleusercontent.com/img/b/R29vZ2xl/AVvXsEgOrMZxECI4csgXZx_oTRaeXsiaFEslYB50G_E_pRK2TlbBQM0gze1TmwwnfFrbjOj_mPHdwNIxyfrhBfdPA9Iz5riAFuxVU8RobqpjN0Zqf-zfzYSHBzgfUty6KzlBTfKw66XHHAH8LI2P/s1600/comment+bubble+1.png) no-repeat;
width: 50px; /*image-width size*/
height: 48px; /*image-height size*/
float: right;
display: block;
margin-right: 5px;
margin-top: -15px; /*comments-counter position*/
text-align: center;
font-family: 'Century Gothic','Lucida Grande',Arial,Helvetica,Sans-Serif;
font-size: 15px;
font-weight: normal;
}
.comments-number a:hover, .comments-number a:active {
color: #1BA0E1 !important;
text-decoration: none !important;
}
</style>
<!-- comments-count-stops-http://bloggingcreate.blogspot.com-->

Settings:
To change the image, edit the red code above
To change the color of the numbers, edit the code in blue

Images you may use (right-click on the desired image and select "Copy Image Address/Location"):


how to blogblogger blogspotblogspot blogger, how to blogwidget blogger blogspotblogs, how to blogblogspot or blogger, how to blogtutorials, how tocomments, how to, blogspot bloggernew comment, how to blogblog design, bloggerblogger.com


IMPORTANT: You may use any image instead of the one linked in the code above (STEP 7), but you have to mention its dimensions correctly (width and height) for correct placement of numbers on the image.

Step 8. Finally save the template... and enjoy your comments :]

Monday, April 16, 2012

How to Add A Comment Count Bubble To Blogger Post Titles

Having a comment count bubble to each blogger post titles makes your blog more attractive. This improves not only your comments count but also allows your visitors to see what are the most popular posts on your blog. If a post has more comments then it will show the popularity of posts to your readers and visitors. So let's start adding this feature to your blog post titles by displaying the total count of the comments for your Blogger posts:
Step 1.

 If you are using the old Blogger interface:
  • Go to Dashboard - Design - Edit HTML - Expand Widget Template (make a backup)
If you are using the new Blogger interface:
  • Go to Dashboard - Template - Edit HTML - Proceed - Expand Widget Template (make a backup)
Step 2. Find (CTRL + F) the following piece of code in your template:

]]></b:skin>

Step 3. Place this code just above ]]></b:skin>:

.comment-bubble {
float : right;
width : 48px;
height : 48px;
background : url(https://blogger.googleusercontent.com/img/b/R29vZ2xl/AVvXsEjPlp-Y00_sIpQerGWN6olaQxmIO-U57_BNaxTduTSPtrptKkj6pEodEPo5R3AR6Zaxtk-vGwVv9kG6f9A-hRjsbFp0MZRLy_SdGhMRD3gkqFHUrq31EapZ8_7hs_K_XKFcvN8teKCei6c2/s1600/speech+bubble+green.png);
background-repeat: no-repeat;
font-size : 18px;
margin-top : -15px;
margin-right : 2px;
text-align : center;
}

Step 4. Now find the below code:

<b:if cond='data:post.title'>
<h3 class='post-title entry-title'>

Note: If you can't find it, search this code instead:

<b:if cond='data:post.title'>
      <h3 class='post-title entry-title' itemprop='name'>

Step 5. Add this code immediately after it:

<b:if cond='data:post.allowComments'>
<a class='comment-bubble' expr:href='data:post.addCommentUrl' expr:onclick='data:post.addCommentOnclick' style='color: #ffffff; font-size: 18px; font-weight: bold;'><data:post.numComments/></a>
</b:if>

Note:
- to change the color of the comments number, replace #ffffff with the hex value of your color;
- to change the font size, increase/decrease the 18px value;

Step 6. Now Preview your template and if everything is ok, Save the Template.

You can choose one of these images below (Right click on the desired image and select "Copy Image Address/Location" - paste it instead of the red code from step 3)

bubble comment count, bubble blogger postsblogger comments, comment countblogger blogspot, blogger commentsblogger bubble comment countcomments in blogger titlesblogger tips, blogger tricksblogger widgets, bubble comment countbubble comment countBubble Comment CountBubble Comment Count, blogger blogspot

Enjoy (:

Didn't find what your were looking for? Then you might be interested in this tutorial:
Display post author, date, labels and comments with icons below post titles
//PART 2