Step 1.
If you are using the old Blogger interface:
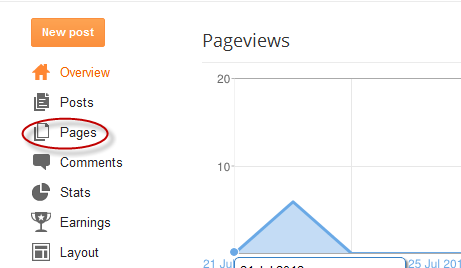
- Go to Dashboard - Design - Edit HTML - Expand Widget Template (make a backup)
- Go to Dashboard - Template - Edit HTML - Proceed - Expand Widget Template (make a backup)
Step 2. Search (CTRL + F) for this code:
- For previous commenting system:
<h4 id='comment-post-message'><data:postCommentMsg/></h4>
- For threaded comments:
<div class='post-footer-line post-footer-line-3'>
Step 3. Add the below code just above it
(for threaded comments, add the code after):
<b:if cond='data:blog.pageType == "item"'>
<div style=' width: 450px; text-align: left; border: 1px dashed #0084ce; background: transparent; padding: 10px; color:#000000; font-weight:bold; '>
<img border='0' src='https://blogger.googleusercontent.com/img/b/R29vZ2xl/AVvXsEj7DtJVVjwIXr2uoLLdh4-iXo73peDwfkTo_MG5fgxH4yh-bcc5SdHwv0GMQEoCyvHrbeMzc6iCmwjQbzNj-emRwanzO0ykC9krUkOxTXZuxyi8fm1oawDpcDqPZKkGdYLjIHgzEFnaUkne/s1600/bloggingcreate.blogspot.com(1).gif'/> :a
 
<img border='0' src='https://blogger.googleusercontent.com/img/b/R29vZ2xl/AVvXsEhUhl5MoXjKtU081CLkgXWELiD0Zy-SxHdb69mC5ElNBh0i-zaWqkRZPR_g4NAnLSIN9qoR8yQ9BQvhqNwrvjILsSJQZDH_Ag0vCYT_1WG0P5AoFWLjzCaCRh27ySBXK7HnVwRnnQflLr83/s1600/bloggingcreate.blogspot.com+(2).gif'/> :b
 
<img border='0' src='https://blogger.googleusercontent.com/img/b/R29vZ2xl/AVvXsEhNTgglsGU32-Amn5t8H0otTpK5QChSmp5uiI1X0yI0eWKJSrudS6NjflMlE7benPcfMGPn5DCMn0Esw13KriGQ43NRonNJyVKSnngQh6w8wN-F2XBNWwF7L5Brii3MdlgEbvqKkL5mH2U8/s1600/bloggingcreate.blogspot.com(3).gif'/> :c
 
<img border='0' src='https://blogger.googleusercontent.com/img/b/R29vZ2xl/AVvXsEjCP-TKj8STahOJ7VzBtbzP-kuVyJehBN_YFBdczDEaJhcXPcTPACKjZI-nC5LqOvU9-NM-10CvXaQxgTS2Gm31mbjSj3JmTXuCheok-oLc9pSpDhk3Mc36cWANs0mGu494XzNEMYtdbcOC/s1600/bloggingcreate.blogspot.com(4).gif'/> :d
 
<img border='0' src='https://blogger.googleusercontent.com/img/b/R29vZ2xl/AVvXsEiGO4HvhPv8-ZwiE3Olos81I5_87Nna4_5KBlMWYeqlyiIkY305ikpDx6Z2N0p0ZqXa_0VPqmtl842yGGVM23-UzQkfFZDTKIisdn8hYUCcfpxROFLTnlOlls7hSZuHicINMQeg3lKzmg2a/s1600/bloggingcreate.blogspot.com(5).gif'/> :e
 
<img border='0' src='https://blogger.googleusercontent.com/img/b/R29vZ2xl/AVvXsEiWOufGgrfIyiDMVE5CD8yMrdyvz6EybaNoeteUM0CJha_W6BS8Xp32JrNRS0E_CHBwZb27_hKxmD14r-w2y8yAD5lnJOk3WiP-rW4T0VSub6tbgmOZZUoiwphF2s5FGhS5yxT6CQFVHT6M/s1600/bloggingcreate.blogspot.com(6).gif'/> :f
 
<img border='0' src='https://blogger.googleusercontent.com/img/b/R29vZ2xl/AVvXsEi4XKIzzD3pVUVxZPF5SW1VZp8YOa3dI_wKBLMvaU6_UIvLOO0OsV1Y30bw0xyI5Vzl0un8ytLZQmvyktSXOnsRSGP2PfGE6IGMfXiMeItOjp_4ZcplNngYKOjyv3D4PmPNC6G-Q4TX0gM5/s1600/bloggingcreate.blogspot.com(7).gif'/> :g
 
<img border='0' src='https://blogger.googleusercontent.com/img/b/R29vZ2xl/AVvXsEj9RM8NjjNO36ZEcvWiJJEzJAvIf0Mt_rFYWKKeIRo98gHZtZes8bvJJXRFbdT0W9lQlOH_pRQMDhUzhvnSInwPCgFP9VlBcJHrITWumjtjDxUy04fhBluIeSJYY7AcpJkrDOAi-knTdh9N/s1600/bloggingcreate.blogspot.com(8).gif'/> :h
 
<img border='0' src='https://blogger.googleusercontent.com/img/b/R29vZ2xl/AVvXsEgMERkuj7P5u9Of7ZDwGkLjyssEvC3vKnESdkHliqWFjYTdyqBbFgBX9vByfq8sJCpcIgA04b8AeF4VOYUkl4TtsflXBmF6i1QNpqLygRW7VyhO0qnFzPOTQr97Gx3eeqOYn4LaM5YN2PT3/s1600/bloggingcreate.blogspot.com(9).gif'/> :i
 
<img border='0' src='https://blogger.googleusercontent.com/img/b/R29vZ2xl/AVvXsEgu7xxFwTxVhoRbMIExn5YuQnm_-dMd9bzY5zIvyXEV7ufdlZQxWPmwTfrS1qnIjKSObBkHCEsPXUmdioD80DJ6FrWadB7rDX1PvOkyFc1fvbTlB4FzHXItoaDoBVv9it70lIwx_tq2PNO2/s1600/bloggingcreate.blogspot.com(10).gif'/> :j
 
<img border='0' src='https://blogger.googleusercontent.com/img/b/R29vZ2xl/AVvXsEgUqHj2Tu1oy1AjIQRUgn7cKwCS9RHg0qSBILQ6U8QYb571164Chpgsq5QJX6x4FS5YY8uyq0lgXLIbgEn-W8Ht8qmu0b8uaveFvTte4mmbazUEQCcujG1VnaS4tFK1t8fC-sJNKd1wUUzq/s1600/bloggingcreate.blogspot.com(11).gif'/> :k
 
<img border='0' src='https://blogger.googleusercontent.com/img/b/R29vZ2xl/AVvXsEgPKqGrWWZIrNUSiHcCyX3Cg-sLqxqOWI2yB7cVjm85JFJ1adlJH6MwUeRsjIbN44sys6Z8KW-ac38vBoLKdNq_xfap8k5PSemQhH3OluBMZFu_ZfD_VFvouU8q4enP47zvIJzik679meve/s1600/bloggingcreate.blogspot.com(12).gif'/> :l
 
<img border='0' src='https://blogger.googleusercontent.com/img/b/R29vZ2xl/AVvXsEhrzBhz18ovCnwJLU2d-QJKQ3g40Zbjm3i4hs_JzCPd-8BfVntocLY9B3pHAmEZkb3EzWghaE3ynfgLTqDjC1EpVUMcWuI6u_hPSmh9nVJpuwc4T83cBTvc8pI52lsIsyNoUXsacJ4n2Vbu/s1600/bloggingcreate.blogspot.com(13).gif'/> :m
 
<img border='0' src='https://blogger.googleusercontent.com/img/b/R29vZ2xl/AVvXsEjhlxWFuJShJ03FA-4ahHkoWdGCPJUfEXjJqoGNvd8jSzHFv070Lrd_nJygm55yEFcKwETNIVRhgB3BkPopYRRs0QdhsBNdBlz9Ntm1m_RkJHT0fXTARdrmySVPMRHsdjcDakL6cpvYgC1U/s1600/bloggingcreate.blogspot.com(15).gif'/> :n
 
<img border='0' src='https://blogger.googleusercontent.com/img/b/R29vZ2xl/AVvXsEivdS6OWZVbxPKmUc6zgGRL1owHP1S7O6bNUOjY0awKO_ydVmiVuw2q5Dj0gHRP_53s-8Vwv2OSSZ47jOdNbIJ4qGeg9fk-l0K0nUnDf_W-e3TLU6xbg8X46tB0CeEZcsWkbbBihwxj0RIR/s1600/bloggingcreate.blogspot.com(16).gif'/> :o
 
<img border='0' src='https://blogger.googleusercontent.com/img/b/R29vZ2xl/AVvXsEiQTWmL1A6t0ZXjDgj2Le7Feb0MfuGA5_h-4N6TzBkA7eXk9iBLWEJYR6b8C96yGrDZEAZPQSGrEhHoP5ShwAsM_61vl5ZFYEj-a8OGaLqZcS14TupivqDM_iKpnGh8Sb0WBpkZ1UC9scyI/s1600/bloggingcreate.blogspot.com(14).gif'/> :p
 
<img border='0' src='https://blogger.googleusercontent.com/img/b/R29vZ2xl/AVvXsEizqTGjrAQkVg5R8K2WsJxfbMWpFeJrOo0rjTBsEK3r3aefr72GoHHzYGgMtRfhm9uM66Md8HTbWuw1LhCdpTgKsS8MDsaFUUSocXFkzpXkNe4hr6Qw2zgfFV_LTZB6EJzhoTGAdBdtEKKA/s1600/bloggingcreate.blogspot.com(17).gif'/> :q
 
<img border='0' src='https://blogger.googleusercontent.com/img/b/R29vZ2xl/AVvXsEiXQ1vMxc4eWi4FP3giJ2TNCx6rshxkPa6gzuiCjWcE1RxCeSnNdx_J05wHC5dob1WkyR5EwULcuazYIGqsnAdGbwtOro69vb4pxZIUxy820NlCt3MdLbSwWIszuqqrPFi3d_gzmPIvaGcA/s1600/bloggingcreate.blogspot.com(18).gif'/> :r
 
<img border='0' src='https://blogger.googleusercontent.com/img/b/R29vZ2xl/AVvXsEhIwlhp14Rj6RTmiiZVOLVum0KYi-QMtiCHhbxk4ib_vftovyhY9gnfslsskJyk_K6Y-sAlQWa25HLnTbCTC_UYnOE-G7Pkjmm0gnNnFFPu7lRVmIKqC_lLk1QPlOB9xZDJhvK05ryteeSx/s1600/bloggingcreate.blogspot.com(19).gif'/> :s
 
<img border='0' src='https://blogger.googleusercontent.com/img/b/R29vZ2xl/AVvXsEhJtNkZzrQ-8-CxwqO7-ljn__LJnLeti4AlCaZsPqGPmXN0qfkuHf6-75g3m0yHsNYtYQydTT75MpSlm-vlTJr83o3aKsUQG6YPHcMXXfkB7RBq7F1TuYMYzTyoW7JB6mymNruoAS-QsQW4/s1600/bloggingcreate.blogspot.com(20).gif'/> :t <a href='http://bloggingcreate.blogspot.com/2012/05/add-facemoods-emoticons-to-your-blogger.html' style='color: rgb(30, 122, 183); font-size: x-small;'>Add smileys to Blogger + </a>
</div></b:if>
Step 4. Now search for this piece of code:
</body>
Step 5. And add the following code immediately above it:
- For previous commenting system:
<script type='text/javascript' src="http://bloggingcreate.googlecode.com/svn/trunk/facemood emoticons.js"/>
- For threaded comments:
<script type='text/javascript' src="http://bloggingcreate.googlecode.com/svn/trunk/facemood emoticons threaded.js"/>
Step 6. Save the Template. And enjoy your comments :>