Sunday, March 11, 2012

Recent Comments Widget For Blogger


The Recent Comments Widget for Blogger displays recent blog comments on your sidebar, showing a snippet of comment along with the title of the post to which the comment was made. If you want to encourage your readers in leaving comments on your blog, this is a widget you shouldn't miss.

How To Install The Recent Comments Widget For Blogger

Step 1. Go to your Blogger Dashboard >> Design >> Page Elements >> Add a Gadget >> HTML/JavaScript.


Step 2. Copy and paste in the HTML/JavaScript box the following code:

<script style=text/javascript src="http://bloggingcreate.googlecode.com/svn/trunk/recent comments widget.js"></script><script style=text/javascript >var a_rc=5;var m_rc=false;var n_rc=true;var o_rc=100;</script><script src=http://your-blog-name.blogspot.com/feeds/comments/default?alt=json-in-script&callback=showrecentcomments ></script><span id=rcw-cr><a href=http://bloggingcreate.blogspot.com/2012/03/recent-comments-widget-for-blogger.html>Recent Comments Widget</a></span><style type=text/css> .rcw-comments a {text-transform: capitalize;} .rcw-comments {border-bottom: 1px dotted; padding-top: 7px!important; padding-bottom: 7px!important;} #rcw-cr {font-family: Arial,Tahoma;font-size:9px;padding-top:7px;display:block;} </style>

Step 3. Replace your-blog-name with your blog url.

Step 4. Click Save and you're done.

Enjoy!

Saturday, March 10, 2012

Hide/Show Widgets/Gadgets in Home/post/static/archive pages in Blogger

As you have probably observed, all the widgets/gadgets you add to your blog, will be displayed in all the pages by default, including your homepage too. And if you haven't heard about this already, Adsense can disable your account only for the reason you've put ad units on the content of your contact or privacy policy pages. Isn't that ridiculous? Well, if you ask me, the answer would be: yes and no. First of all, lots of widgets can make a blog/site to look unprofessional, increasing page loading time, therefore visitors will lose their patience.

To hide (or show) widgets in particular posts, static pages, homepage or archive pages, you can use conditional tags.

1. First of all, go to Blogger's Dashboard >> Design >> Page Elements and give a name for the HTML/Javascript gadgets you have already added. Doing this it will be easy for you to identify the widgets in your blogger template. Give it a unique title so that it does not match with any of the titles of other widgets added.

2. Then go to Dashboard >> Design >> Edit HTML and check the "Expand Widget Templates" box.

3. Find your widget in the HTML by using Ctrl+F and entering the widget's name in the search box. Let's say i have given the title for my widget as "Recent Posts". After searching you will find the below snippets:

<b:widget id='HTML1' locked='false' title='Recent Posts' type='HTML'>
<b:includable id='main'>
<!-- only display title if it's non-empty -->
<b:if cond='data:title != ""'>
<h2 class='title'><data:title/></h2>
</b:if>
<div class='widget-content'>
<data:content/>
</div>

<b:include name='quickedit'/>
</b:includable>
</b:widget>  

This code represents the widget/gadget that you have added in the Page Elements location. All you have to do is to add the following conditional tags marked with red just below and above to hide the widget from specific pages or posts in Blogger. Let's see some examples:

To show the widget only in Homepage:

<b:widget id='HTML1' locked='false' title='Recent Posts' type='HTML'>
<b:includable id='main'>
<b:if cond='data:blog.url == data:blog.homepageUrl'>
<!-- only display title if it's non-empty -->
<b:if cond='data:title != ""'>
<h2 class='title'><data:title/></h2>
</b:if>
<div class='widget-content'>
<data:content/>
</div>

<b:include name='quickedit'/>
</b:if>
</b:includable>
</b:widget>

To show Blogger widget only in post pages 

<b:widget id='HTML1' locked='false' title='Recent Posts' type='HTML'>
<b:includable id='main'>
<b:if cond='data:blog.pageType == "item"'>
<!-- only display title if it's non-empty -->
<b:if cond='data:title != ""'>
<h2 class='title'><data:title/></h2>
</b:if>
<div class='widget-content'>
<data:content/>
</div>

<b:include name='quickedit'/>
</b:if>
</b:includable>
</b:widget>

To show the widget in a specific page
 
<b:widget id='HTML1' locked='false' title='Recent Posts' type='HTML'>
<b:includable id='main'>
<b:if cond='data:blog.url == "URL of the page"'>
<!-- only display title if it's non-empty -->
<b:if cond='data:title != ""'>
<h2 class='title'><data:title/></h2>
</b:if>
<div class='widget-content'>
<data:content/>
</div>

<b:include name='quickedit'/>
</b:if>
</b:includable>
</b:widget>

Note: Replace URL of the page with the address of the page in which you want the widget to appear

To hide a widget only in a particular page

<b:widget id='HTML1' locked='false' title='Recent Posts' type='HTML'>
<b:includable id='main'>
<b:if cond='data:blog.url != "URL of the page"'>
<!-- only display title if it's non-empty -->
<b:if cond='data:title != ""'>
<h2 class='title'><data:title/></h2>
</b:if>
<div class='widget-content'>
<data:content/>
</div>

<b:include name='quickedit'/>
</b:if>
</b:includable>
</b:widget> 

To show widgets only in static pages

<b:widget id='HTML1' locked='false' title='Recent Posts' type='HTML'>
<b:includable id='main'>
<b:if cond='data:blog.pageType == "static_page"'>
<!-- only display title if it's non-empty -->
<b:if cond='data:title != ""'>
<h2 class='title'><data:title/></h2>
</b:if>
<div class='widget-content'>
<data:content/>
</div>

<b:include name='quickedit'/>
</b:if>
</b:includable>
</b:widget> 

To hide widgets in Static Pages

<b:widget id='HTML1' locked='false' title='Recent Posts' type='HTML'>
<b:includable id='main'>
<b:if cond='data:blog.pageType != "static_page"'>
<!-- only display title if it's non-empty -->
<b:if cond='data:title != ""'>
<h2 class='title'><data:title/></h2>
</b:if>
<div class='widget-content'>
<data:content/>
</div>

<b:include name='quickedit'/>
</b:if>
</b:includable>
</b:widget> 

To show widgets only in Archive Pages

 <b:widget id='HTML1' locked='false' title='Recent Posts' type='HTML'>
<b:includable id='main'>
<b:if cond='data:blog.pageType == "archive"'>
<!-- only display title if it's non-empty -->
<b:if cond='data:title != ""'>
<h2 class='title'><data:title/></h2>
</b:if>
<div class='widget-content'>
<data:content/>
</div>

<b:include name='quickedit'/>
</b:if>
</b:includable>
</b:widget> 

After you have added the conditional tags, Save Template and view your blog.

That was all ;)

How to create Google Adsense Account


Google Adsense is the most popular option for monetizing online content, but many bloggers don't know how to create a Google Adsense account. Creating a Adsense account is very easy thing to do and for being accepted you just require a website or a blog indexed by Google, which should contain minimum 10 pages and most important, not violating Google Adsense policies.

Apply Account Approval

You have to create a Google Adsense account before you can be approved.
To do that, go to the Adsense homepage www.google.com/adsense and click on the "Sign up now" red button. Now you must complete the Adsense registration form:


Step 1. Select your Google Account to continue
Step 2. Tell us about your content: enter your main website/blog URL where you want ads to be displayed and then select your website content language.

Read and pay attention to the following Google Adsense policies, because if you break the rules your account might be disabled later. And sadly, you have small chances to get it back...

1. I will not click on my ads nor encourage others to do so. 
2. I will not place ads on sites that include adult content, including pornography. 
3. I will not place ads on sites involved in the distribution of copyrighted materials. 
4. I do not already have a Google AdSense account. 
5. I will not place ads on sites that include incentives to click on ads.

Check "I have read and agree...", and then press "Continue"

Step 3. Submit your adSense application: select your account type and enter your personal information (country, your real name, address, phone). These informations will be used when you will receive your payment. Now press "Submit my application" to finish with the registration.

After submit the form Google will review your blog and your registration. Wait maximum 2 weeks to get your Adsense registration approved... or rejected. Google will send you an email to your inbox if your account has been approved.

Good luck!

Friday, March 9, 2012

How to create a Facebook Fan Page for your Blog

What is a Facebook Page?

Sometimes referred to as a "Fan Page," a Facebook page is a single page where you can share & talk about any particular subject you want: a celebrity, a blog you find interesting, whatever your heart desires. Think of it as a one-page meeting place, with information, links, a message forum box, RSS and anything else you want.
make money online, facebook, how to

Want to promote your blog? Then Facebook is one of the best choices when it comes about Social Networking Sites. Here is my Facebook Fan Page.

Make a Facebook Fan Page for your blog.


Step 1. Go to the Create Fan Page Link on Facebook and select Brand or Product

facebook popular, facebook friends

Search for "Website" in the drop down list and provide the Page name (e.g., name of your blog) in the next box. Check the "I agree to Facebook Pages Terms" box, then click on the "Get Started" button.


Step 2. You will be transferred to the next page - here you can "Upload an Image" for your Fan Page or Skip to upload it later. Browse for your image clicking on the "Upload from computer" link:


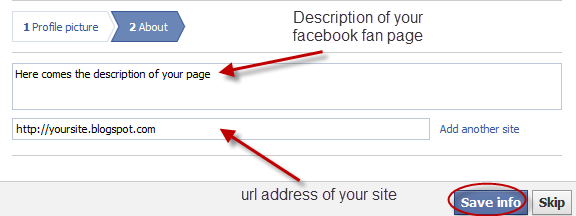
Step 3. Enter your site/blog description and the url address. These informations will appear on your Facebook page. After you have finished, click "Save info".


Step 4. Now you are transferred to your new Facebook Fan Page. To "Manage" your information, click on the "Manage" Button at top right corner of the page.

Get a Shorter Facebook Fan Page URL

Your Fan Page URL will look something like:
http://www.facebook.com/pages/Helplogger/120574614736021
Now, if you have minimum 25 fans, you the possibility to shorten your facebook URL, to look something like this: http://www.facebook.com/helplogger

To do that, go to http://www.facebook.com/username/ and click on set a username for your pages. There you can select the username for your fan page. And be careful when you choose your Facebook Fan Page Username because afterwards you can't change it back.


Use RSS Graffiti Application to share your most recent blog posts

If you want to automatically add your blog posts to Facebook, then use the RSS Graffiti Application.
Steps:

1. go to http://apps.facebook.com/rssgraffiti/ and authorize RSS Graffiti: click on the "Click here to authorize RSS Graffiti" button.
2. once authorized, you will see a list of your fan pages on the left: click on the Fan Page Name
3. authorize RSS Graffiti to access your fan page: click on "Click to authorize" button.
4. Click on the Add Feed Button, and enter your feed url.

For example, if your blog is http://yourblog.blogspot.com, then your feed URL will be http://yourblog.blogspot.com/rss.xml

Click the link which says "click here to fetch and preview" and see if its grabbing your blog feed. (if it's not grabbing your feed, then check if you have enabled the blog feeds. If your blog is not hosted on blogger, then your feed url will be different.)

5. After you have added your blog feed, go to the Filter Tab and click on the Change link next to the "Cut-off date/time". Choose the latest posts of your blog from the drop down and click on the Save button.

Don't worry if your posts don't appear immediately on your Facebook Fan Page Wall, there might be some delay in the wall getting updated, as RSS Graffiti checks the feed for new entries at regular time intervals.

How to remove/hide or add a Peek A Boo Effect to your Blogger Navbar

What is Blogger Navbar?
For those of you who create a blog in blogger.com, you will see a bar at the top of your blog page. The bar is called Blogger Navbar (Blogger Navigation Bar) and it appears by default at the top of every hosted Blogspot blogs.

Blogger navbar functions include:

  • [B] (blogger logo): takes you back to blogger's homepage
  • Search Blog: you can make searches on the blog and results will appear directly on the page.
  • Follow: you can follow the blog you're currently viewing (blog updates will appear on your Blogger dashboard at Reading List - if you're not logged, you'll see a Share link, which allows you to share you favorite blogs on social networks like Twitter, Facebook, Google buzz, and Google Reader)
  • Report abuse: you can report a blog if you consider its content objectionable (e.g., pornography);
  • NextBlog: takes you to a random, recently-updated Blogger blog.
  • email address@: If you are logged in to your account, you'll see your own address here. Other viewers will see their own email addresses, or none at all if they aren't logged in.
  • Post: Direct link to the post editor
  • Design: this link takes you to Page Elements, where you can add gadgets/widgets for your blog
  • Sign In/Out: This displays the appropriate option, depending on whether you're logged in or not.

Blogger navbar is available in several colors, and is configured in the Template tab in Blogger's interface. If you are using a classic template, you'll see a menu (Design > Page Elements) from which you can select a color.

This Navbar can be useful but the only real disadvantage is visual. If you have customized design, Navbar usually doesn't fit in. In this tutorial i'll show you how to remove it or add a peek-a-boo effect.

Removing/Hiding the Blogger Navbar
blogger, what is blogger, blogger tutorials

Step 1. Go to: Dashboard >> Design >> Edit HTML > check "expand widget templates" box
Step 2. Find (CTRL + F) the following line:

]]></b:skin>

Step 3. Just above it, paste this code:

#navbar {
height: 0px;
visibility: hidden;
display: none;
}

Step 4. Save your Template.

blogger blogspot, remove navbar, peek a boo, designThere's another way of showing a Navbar. It's called:
"Hover Peek-a-boo Blogger Navbar":

The navbar will only appear when you hover around the area on the top. Take a look at the demo

Add a Peek-a-Boo Effect to Blogger/Blogspot Navbar


Step 1. Login to your Blogger Dashboard, then go to Design >> Edit HTML > check "expand widget templates"

Step 2. Search for the following piece of code:
]]></b:skin>
Step 3. Add the following code just above it:

#navbar-iframe{opacity:0.0;filter:alpha(Opacity=0)}
#navbar-iframe:hover{opacity:1.0;filter:alpha(Opacity=100, FinishedOpacity=100)
Step 4. Save the template... and you're done!

If you have any questions, leave a comment below.
//PART 2